Step 1: Preparing the USB memory stick.
a) Make sure you format the USB stick to FAT16 (This will erase any data currently on the USB stick)
b) Download the following file data.zip from this location.
c) Unzip to the root directory of your USB stick. (Make sure you do not modify the files in any way)
Step 2: Install Skype.
Skype is used as a launchpad for executing this hack, so you need to install Skype in order to proceed.
It is worth mentioning that Skype will no longer work on the television as long as the SamyGo hack is installed.
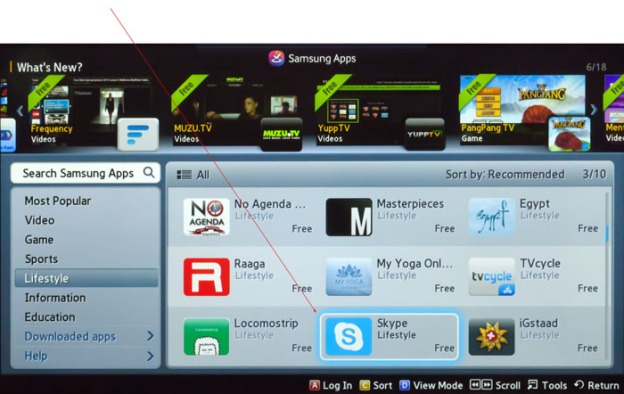
a) Install the widget from the Samsung App Store. (The app store widget is located at the top/right of the Smart Hub)
b) Once installed, run the Skype widget. (You may need to create an account with Skype if you don’t already have one).
c) When you are logged in, ensure that the setting for auto-logging in is selected.
d) Exit Skype.
Step 3: Plug USB stick into television.
a) The USB stick with the data.zip files extracted should now be plugged into any spare USB port on the television.
Step 4: Set up Develop Account.
You must now install the SamyGO widget onto your television. At the moment, this can only be done via the Samsung develop account.
a) Enter the Smart Hub by pressing the Smart Hub key on the remote.
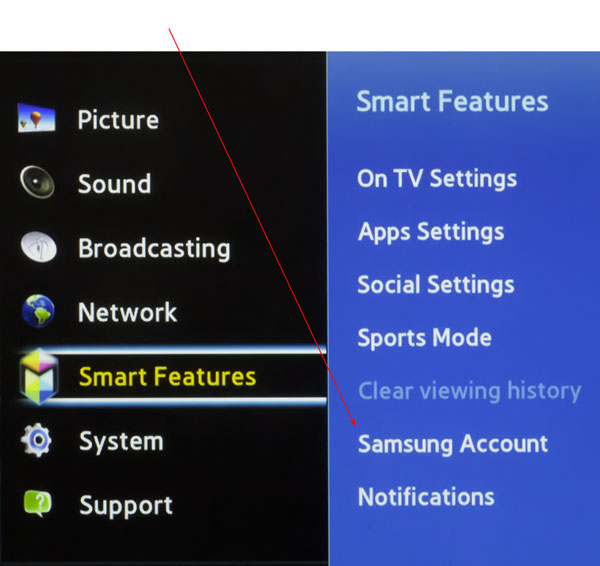
b) Press the Menu button on the remote and drill down as follows: Menu >> Smart Features >> Samsung Account >> Log In (Note, you must have started this whilst in the Smart Hub)
 c) type “develop” into the email field as shown below. You do not need a password, just select Log In afterwards.
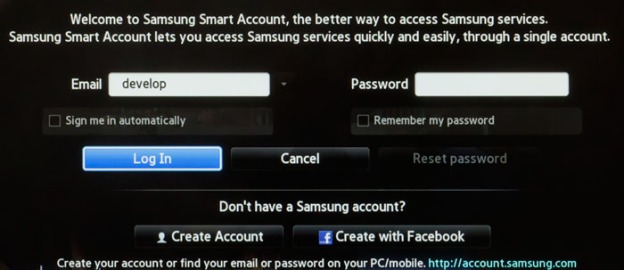 You are now logged in as a developer.
Step 5: Download the SamyGO widget.
a) Download the SamyGO widget from here, and keep in a handy place.
Step 6: Install SamyGo widget.
There are several ways to install the SamyGO widget onto the television. Some tech savvy people will already have an Apache Server installed on their computer, and this can be used. (Xampp is very popular). And if you prefer to use this method, do so, then jump to step 7.
On the other hand, a rather clever chap over at SamyGO forums called Spooky has kindly provided an excellent little application that not only will assist in moving across the widget, but can manage widgets later on. Unfortunately, this currently only works from a Window’s machine, so if you don’t have one, you will have to go the Web Server route, or ask Spooky to port the app over to the Mac or Linux.
a) Visit Spooky’s web page and download the application. Keep in mind that when installing, agree to any firewall requests. This is important otherwise the television may not be able to communicate with the application.
b) Once the app is installed on your Windows PC, copy the SamyGO widget to the following folder: c:\\Sammy Widget Manager\widgets (This must still be in zip format!)
c) Press the Refresh button, and if you placed the SamyGO.zip file in the right folder, it will appear on the screen.
d) Tick the box next to the SamyGO widget.
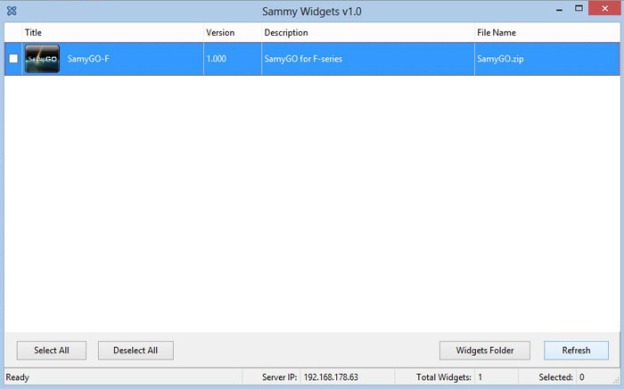
e) You now need to find the IP address of your Windows PC/Laptop. If you don’t know how to do this, visit this page.
Step 7: Move SamyGO widget across via the develop account.
You should now have the following:
- A USB stick plugged into the television with the data file extracted at the route level.
- Skype is installed on the television and has been run.
- An account called develop is logged in on the television.
- A windows laptop with Sammy Widget Manager installed and a downloaded copy of the SamyGO widget on the laptop in the appropriate folder (still in zip form) as described in Step 6, or your own Apache server set up also with the SamyGO widget in the appropriate place.
- The IP address of your windows PC where the Sammy Widget Manager is installed written down, or any other computer where you have the Apache Web Server.
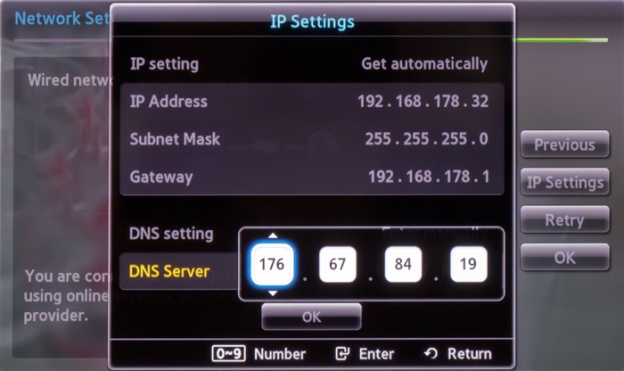
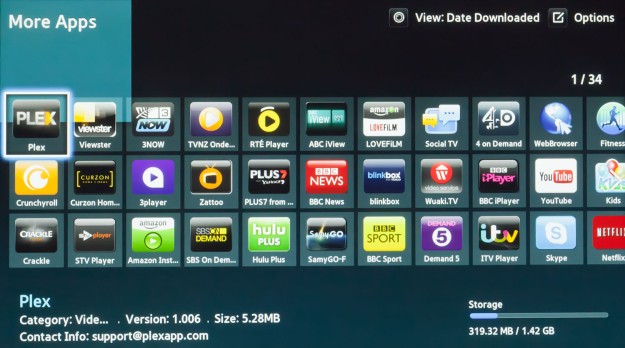
a) On the television, within the Smart Hub, head to the bottom of the screen where it says More Apps, and select.
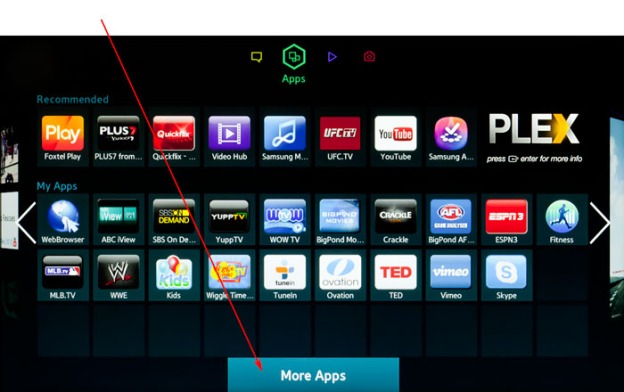 b) In the More Apps screen, use the remote to navigate to the Options button at the top/right of the screen.
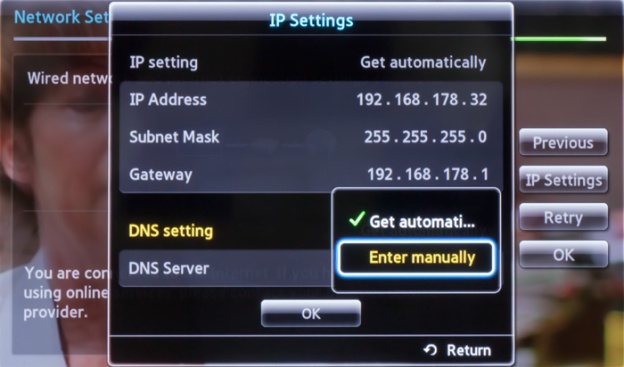
c) Select the IP Settings option.
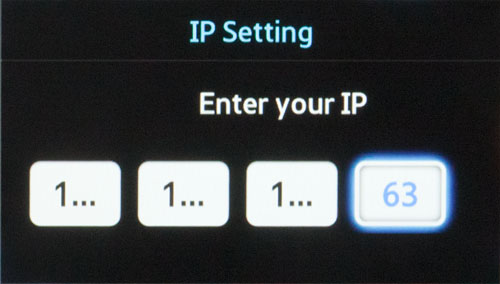
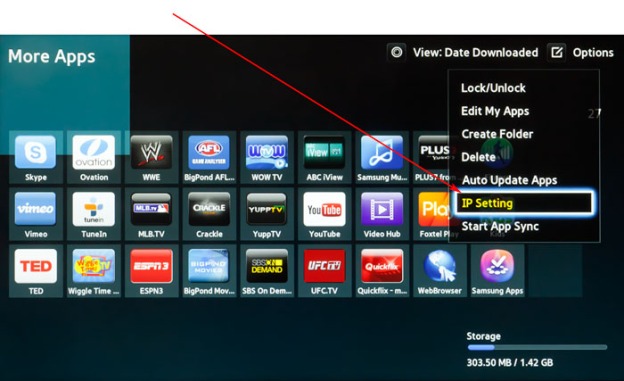 d) Type in the IP address here of the computer you have either the Sammy Widget Manager Installed and running, or the Apache server.
Don’t worry if you can’t see the full numbers, just use the Right button on the remote to go to the next box. When done, press the Enter button.
e) Select Start App Sync to transfer the SamyGO widget across to the television. If everything has worked well, you should see it on your Smart Hub
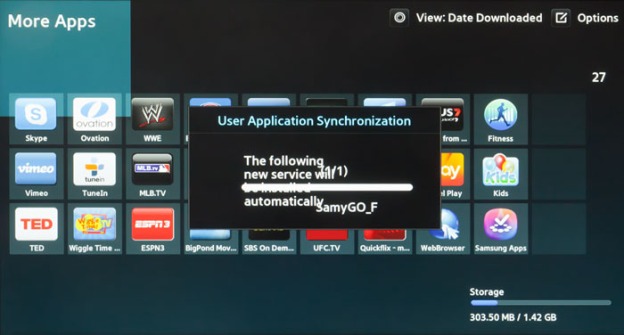
What could go wrong? Lots, but some pretty common errors could be:
- The laptop or computer with the Apache server or Sammy Widget Manager has gone to sleep.
- An incorrect IP address for the PC/laptop has been set up on the television’s develop setting.
- The Sammy Widget Manager is not currently running.
- The SamyGO widget is not ticked in the Sammy Widget Manager.
Step 8: Run the SamyGo widget.
a) Click on the SamyGo widget that is now installed on your television. You should see the following image on your screen.
NOTE: If there is an error message that says the activation files are not correctly found, this process will not work. Ensure the USB stick has the correct files unzipped and saved at the route level.
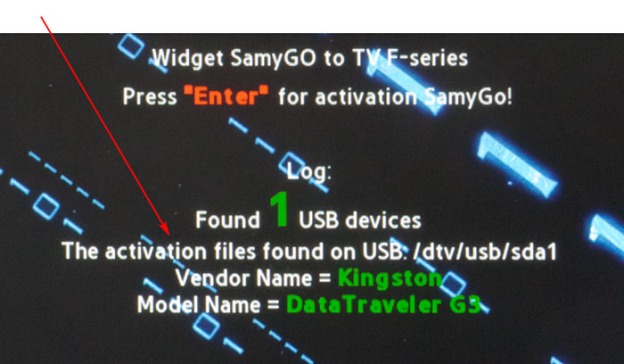
b) Press
Enter to continue. If all went ok, you should see the following screen.
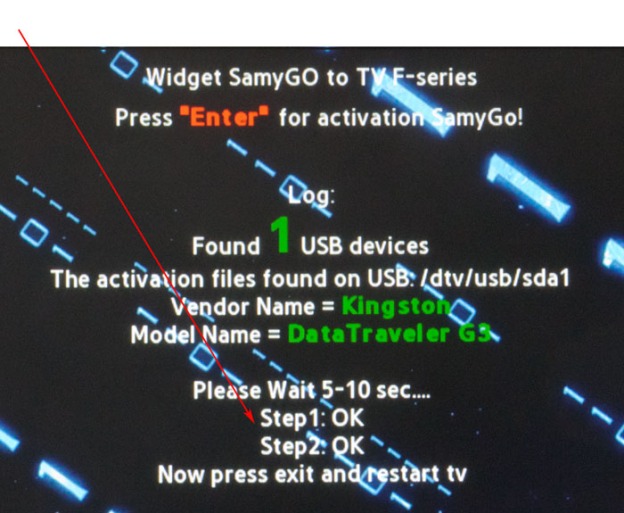 c) Press exit.d) Restart the television.
STEP 9: Select the widgets from the alternative country app stores.
Now is a good time to decide what default store you wish to use, and which widgets from other stores you may want to move across. Generally speaking, choose the default country by which widgets you use the most, as these will be automatically updated. I tend to default at the UK store, as this contains the largest collection of usable apps from any region, but this choice is entirely yours.
a) Change the app store to the country you wish to accumulate additional apps. For instructions on how to do this, follow the steps here.
b) When you are in the country store you wish to acquire further widgets, install the ones you want from the app store.
STEP 10: Telnet or FTP into your television.
Once you have all the widgets you want from the additional store installed, you will need to copy them across to a computer on your network. It is possible with some methods to simply copy them directly to the correct folder on your television, but I prefer this method as it also creates a backup of your favourite widgets.
There are a lot of different ways to connect to your television within your network, but I find using a good FTP application easy enough. For the purpose of this guide, I’ll be using Cyberduck on a Mac, but other FTP clients may work just as well or better.
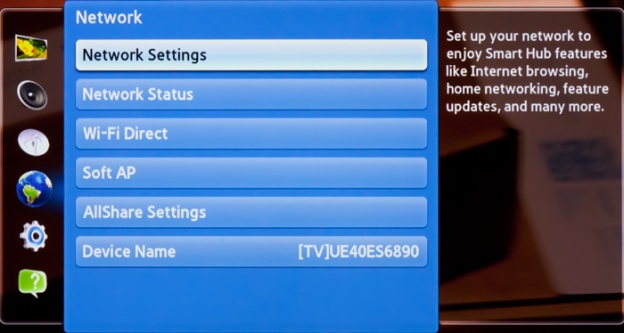
a) Ensure your TV is on and note down its IP address. This can be found under the Samsung TV’s Menu => Network Status.
b) Fire up the television’s Smart Hub.
c) Open Cyberduck on a computer within your network and enter the television’s IP address into the top field and press Return to connect. (Sometime’s you may have to wait a minute or two before trying to connect)

If you can’t connect to the television at this point, there could be a number of reasons. 1st, make sure your computer is within the same network, 2nd, ensure the SamyGO widget was installed correctly.
d) Navigate to /mtd_rwcommon/common/wgtmgr/info.xml (or info2.xml) on your television using Cyberduck and examine this file (I find Quick-Look generally does the job but you can easily download it to your computer to view). Here you will find a list of widgets that are on your television.
Note: If you have tried to access another country’s apps, but find that the old list from the previous country is still showing, shut down and restart Cyberduck.
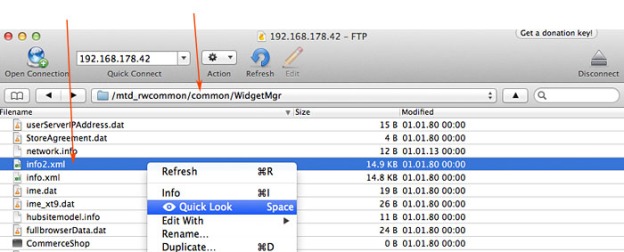 e) Look through the list and identify the ID numbers for the widgets you wish to retain. Generally speaking they are represented by a long number such as Zattoo which has the ID: 111299001432.f) Now, navigate to /mtd_rwcommon/widgets/normal on your television using Cyberduck and find the widgets you want by their ID numbers and download them to a folder on your computer (Right-click on folder in Cyberduck and select Download To…). Note: Download the entire folder which holds the widget ID as name, not selected contents within.
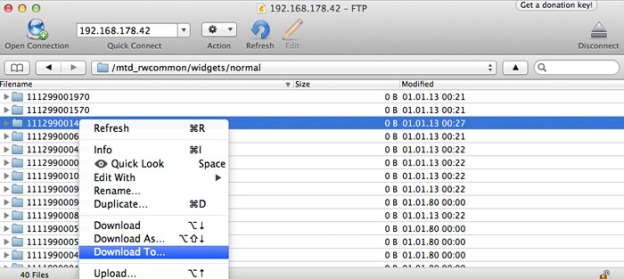
You now have a backup copy on your computer. If for some reason you accidentally delete these widgets on your television, or they disappear due to something Samsung has done, it is possible to easily reinstall back onto your television. All widgets manually copied across sit in the USER folder and hold a different status.
g) Navigate to /mtd_rwcommon/widgets/user using Cyberduck and Upload the widget folder now on your computer back to the television, saving it in the USER folder.
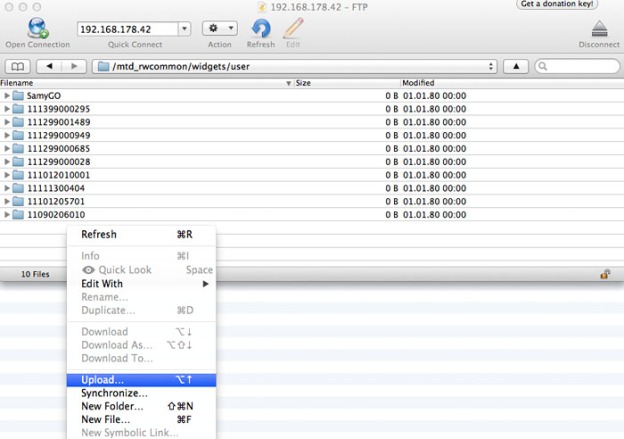
Opps, if you find the USER folder has disappeared, no worries. Just log back into the develop account.
That is basically it. You can repeat the process if you like, visiting other country app stores to acquire additional widgets. When finished, simply return back to your default app store and move the widgets around to more accessible positions.
It is your choice if you wish to delete the Install SamyGO widget on your television. If you do so, you will have to install it again to be able to FTP back into your television.
CREDITS
SOURCE
EyeOnDemand.com
 Step 2:
 Step 3:
 Step 4:
 Step 5: